Monday, December 30, 2013

Posted by Unknown 12:36 PM No comments

Instructions

1.  Hard boil your eggs! Now, you could try baking them instead, but I don’t recommend it for 2 reasons: 1) it’s harder to peel and 2) brown spots occur sometimes when you bake them which is not as pretty.  However, with that said – I still baked them because I was lazy and wanted to walk away from the kitchen for half an hour :P
2.  Slice your hard boiled eggs in half vertically.
3.  Scoop out the solid yolk and dump it in a medium sized bowl.
4.  Chop up your cilantro and add to bowl.
5.  Cut up your avocado and put half of it in the bowl.
6.  Add your salt, pepper, and lime juice (optional) to the bowl.
7.  Now mash it all together.  I use a masher for this, and it works great!
8.  Scoop out the mashed deviled eggs mixture in to egg’s holes.
9.  Add a dash of paprika (or not, it’s optional!) and maybe small cilantro leaves for garnish, and you’re done!
Healthy Deviled Eggs!

Wednesday, December 11, 2013

Posted by Unknown 7:55 AM No comments


Ingredients:
1/2 lb Bacon, diced
1 large shallot, diced
1 tablespoon butter
1 tablespoon brown sugar
2 pears, cored and sliced into bite sized pieces
6 eggs, lightly beaten
1 cup almond milk
1/2 teaspoon thyme
1/2 cup gorgonzola or other blue cheese, crumbled
1 pre-baked almond butter pie crust (see below)

Directions:
1. Cook the bacon and shallot in a pan.
2. Add the butter and let it melt.
3. Add the sugar and cook until bubbly, about 3 minutes.
4. Add the pear and saute until tender, about 3-5 minutes.
5. Mix the pears, eggs, half and half, thyme and gorgonzola and pour it into the pre-baked pie crust.
6. Bake in a preheated 375F oven until golden brown on top and set in the center, about 25-45 minutes.

Almond Butter Pie Crust
(makes 1 crust)


Ingredients:
1 cup GF all-purpose flour
1/2 cup ground almond (toasted before ground) 
1/2 teaspoon salt
1/2 teaspoon sugar
8 tablespoons (1/2 cup or 1 stick) unsalted butter (cold, cut into 1/2 inch cubes)
4-5 tablespoons water (cold)

Directions:
1. Pulse the flour, ground almonds, salt and sugar in a food processor to mix.
2. Add the butter and pulse until the mixture resembles a coarse meal, about 6-8 times.
3. Add a tablespoon of water at a time pulsing in between until it starts to clump together.
4. Place the dough on a clean surface and shape it into a disc.
5. Wrap the dough in plastic and refrigerate for at least an hour.
6. Roll the dough into a 12 inch circle about 1/8 of an inch thick on a lightly floured surface.
7. Place the dough into a 9 inch diameter spring form pan with the edges going up the side of the pan.
8. Place a piece of parchment paper in the pie and fill it with rice or beans to hold it down.
9. Bake in a preheated 350F oven for 15 minutes.
10. Remove the parchment paper and weight and poke the bottom of the crust with a fork a few times.
11. Bake until a light golden brown, about 10 minutes.

Wednesday, November 20, 2013

Posted by Unknown 6:20 AM No comments


Raw Nut Pulp Hummus 
Ingredients:
1 ¼ cup nut pulp (leftovers from making nut milk from this recipe)
1 fat clove garlic
4 Tbsp. lemon juice
2 Tbsp. water
4 Tbsp. raw tahini (or other raw nut butter)
1 tsp. ground cumin
¼ tsp. crushed chilies or cayenne pepper
pinch sea salt + pepper
Directions:
1. In a food processor, pulse to mince garlic. Add everything but the nut pulp and blend until creamy.
2. With the motor running, slowly add the nut pulp a few spoonfuls at a time until you have everything well blended. If desired, add more water, one tablespoon at a time, until the desired consistency is reached.
3. Serve. Store leftovers in an airtight container in the fridge. (Remember that the nut pulp will last for up to seven days, so make your hummus quickly after the nut milk!)
If you are not using your pulp right away, put it in the fridge in a sealed container. It will keep for about a week, so if you don’t really plan on using it by that time, you have two options to extend the pulp’s shelf-life:
• Freezing is the easiest and fastest way to carry on with your day and forget about the pulp, but you will have to take the time to defrost it prior to using it in your recipes. Put it in a plastic zipper bag, or any sealed container — of course glass is always better when freezing food.
• Dehydrating the pulp is the basis for making almond flour, which will give a finer texture to your preparations. Just spread the pulp as evenly and thinly as you feel like over a teflex dehydrator sheet or baking tray & let it become completely dry. Then pulverize it in the blender and keep in a sealed container.

Chef's notes.....
If you know you are going to use the nut pulp for Hummus, I would suggest using less dates or make an unsweetened almond milk.

Posted by Unknown 6:18 AM No comments
I love almond milk.
But you know what I love more…homemade almond milk.
You can absolutely drive out to your local store and buy almond milk – but once you’ve had it fresh, the rich taste will keep you coming back for more! And guess what? It’s super easy to make.

Homemade Almond Milk
Ingredients
-pure, filtered water for soaking
-1 cup 
raw, organic almonds
-4 cups pure, filtered water, or coconut water.
Optional Add-Ins
-sweetener to taste (i.e. maple syrup, honey, stevia, or my ultimate fave…4-6 medjool dates)
-homemade vanilla extract (I like to add 1 teaspoon to the mix)
-carob powder (Chocolate almond milk anyone!?!)
-spices (i.e. cinnamon, allspice, cloves, cardamon…get creative)
Method


1.Allow the almonds to soak covered in pure, filtered water for up to 48 hours in the refrigerator. Overnight will do, if you’re in a pinch. But, I like to give mine a good couple of days.
2. After soaking, strain the soaked almonds and toss the soaking water.
3. Place your almonds, four cups of pure, filtered water or coconut water, and any optional add-ins in a high-speed blender —  and blend on high until the mixture becomes frothy…approximately 1-2 minutes.
4. Pour the contents of the blender through a cheese cloth lined strainer — or if you have one, a nut milk bag — into a 1 quart glass canning jar. Squeeze to extract all the goodness of the almond meal.
5. Store the milk in the refrigerator. It should keep for up to 3 days. Shake the jar prior to use.
I don’t like the idea of wasting all of that almond meal/pulp. Now granted, most of the nutrients are gone into the milk, but I still find it useful for recipes like Hummus…yum! Or you could dehydrate them for use as a coating for chicken and fish. Perhaps make almond butter. What about using them as a body or facial scrub?
The possibilities are endless really!  

Thursday, October 3, 2013

Posted by Unknown 7:38 AM No comments
I have always wanted to make salsa, but thought it to difficult.
Not anymore.
This salsa was perfect, and a wonderful compliment to the Crispy Smashed Chicken.

 Salsa Rojo


INGREDIENTS:
  • 1 pound of tomatoes
  • 2 medium jalapeno chilies
  • 4 garlic cloves
  • 1/2 tsp Kosher salt
  • juice from 1/2 lime
  • 1 large shallot minced
  • 1/4 cup or cilantro

INGREDIENTS:

Place an over rack about 4-6 inches below a very hot broiler.
Place the tomatoes on the baking sheet, and roast under the broiler for about 5 minutes.

Using tongs, flip them over and roast for another 5 minutes or so.
When they are done the skins should be blackened and peeling off.
Meanwhile roast the chilie peppers and unpeeled for about 15 minutes or until the garlic is soft and the peppers are nicely blistered.( put them all in together and pulled the tomatoes first)

The pepper will probably be done first- take them out as soon as they are done.
When the garlic and peppers are cool enough to handle, peel the garlic and remove the stems from the peppers. 
In a food processor, add the peppers garlic and salt and grind them up.
If you're using a large work bowl make sure to scrape down the sides a few times
Throw the tomatoes into the work bowl
Pulse until a thick puree' results
Transfer salsa to a medium bowl and add lime juice
Throw in minced shallot and cilantro
Stir and Serve

Posted by Unknown 7:12 AM No comments
It was an AMAZING night for food last night.
I am day 3 into my Whole30 journey and I have felt the need to get creative with my cooking so I didn't feel like I was missing out on anything.
Well This meal left me truly satisfied.

Crispy Smashed Chicken with Salsa Rojo
Serves 4

INGREDIENTS:


  • 4 boneless, skinless chicken breasts 6oz each
  • 2 TBS of Ghee or fat of your choice, plus more if needed ( I used Coconut Oil)
  • 1/2 cup of coconut flour
  • 1 TBS Kosher Salt
  • 1/2 tsp garlic powder
  • freshly ground black pepper
  • lime wedge (optional)
  • Salsa Rojo Asada (optional)
FOR GARNISH:

      Roasted Cauliflower

PROCEDURE:

Place chicken between two pieces of plastic wrap or parchment, Then......
Hulk it out and smash the breasts with a meat pounder, rolling pin or small cast iron skillet until the chicken is uniformly flattened into half inch thick paillards.
Melt the Ghee (or fat of your choice) over medium heat in a large skillet
In a large bowl, mix the coconut flour, salt , garlic powder, and a few grinds of pepper,
Dredge the chicken in the flour mixture, and...
Pat off any excess.
Once the cooking fat is melted and shimmering, place the chicken flat side down in the skillet allow it to cook undisturbed for 3-4 minutes
Don't overcrowd the skillet, if your chicken pieced are too big, fry them up in separate batches.
Flip the breast over and cook the other side for another 3-4 minutes or until the exterior is crisp and golden brown.
Slice your paillards and....
Serve it with your favorite sauce,   This chicken is fantastic with lime wedges and spicy salsa. I was surprised at how easy this recipe was.


Thursday, September 12, 2013

Posted by Unknown 9:16 AM No comments
(Courtesy of Paleoaholic )

“Autumn is a second spring when every leaf is a flower.” 
― Albert Camus
Now that my body thinks it is fall, I am craving hearty stick to your ribs food.  I am not quite ready to break out the crock-pot, but definitely looking for something more than a salad.   This recipe has great flavor and the added bonus of a quick weeknight meal. 

Prep Time: 5 minutes
Cook Time: 20 minutes
Total Time: 25 minutes
Ingredients
  • 4 pork chops with the bone in ( I chose boneless )
  • Salt and pepper to taste
  • 4 tablespoons coconut oil
  • 1 large onion, sliced
  • 4 apples, cored and sliced
  • 2 tablespoons honey
  • 1 cup chicken broth (I had enough liquid in my pan that I did not add the broth the Apple and onion when cooked down create a juice)
Instructions
Sprinkle pork chops on both sides with salt and pepper to season. (season to taste)


Heat 2 tablespoons of coconut oil in a frying pan over medium heat.
Cook pork chops in coconut oil and cook for 5 minutes on every side until brown.
Add the remaining 2 tablespoons of coconut oil.      (I did not add remaining oil.)
Stir in the onion, apple slices and honey.


Cook until the onions have caramelized and the apples turn soft. Stir in broth.
Pour the apple and onion mixture over the pork chops as topping.
Enjoy!


Sunday, September 8, 2013

Posted by Unknown 9:29 PM No comments
Living a Paleo lifestyle can be difficult in a house of foodies.  I have felt that lately I have been living a faileo lifestyle when it came to my diet.  Being in off season means that I need to pay attention to my diet more than ever.  My goal this week was to find recipes that my family would enjoy and leave them feeling satisfied.
This is one of my new favorites.
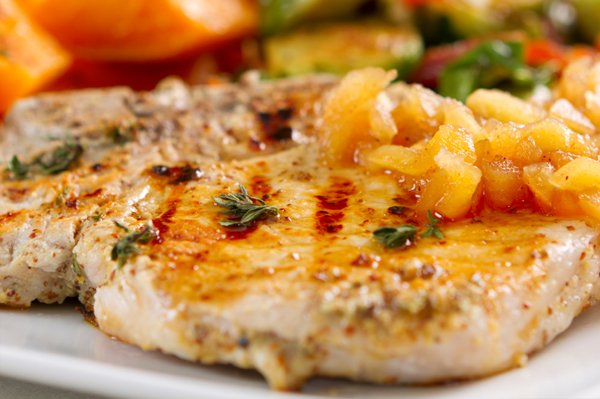
Paleo Chicken Marsala
Serves 4

INGREDIENTS:

·         4 boneless skinless free range chicken breasts
·         4 TBS Extra Virgin Olive Oil
·         2 Large Shallots – chopped
·         6 Cloves garlic – crushed
·         1 Yellow onion – diced
·         1 tsp fresh ground black pepper
·         6 sprigs fresh thyme – leaves removed from stems
·         16-20 fresh sage leaves – torn
·         4 cups of large white or crimini brown mushrooms – quartered
·         1 1/2 cups marsala wine
·         2 Cups Chicken Stock
·         1 1/2 TBS All Purpose Flour Mix

FOR GARNISH:
·         Asparagus spears
PROCEDURE:

Heat stove to Medium High. In a large mixing bowl combine 2 TBS of the olive oil with the shallots, garlic, onion, pepper, thyme, and sage.  Mix well.  Slice chicken into thin chunks and add to mixture.  Combine well and allow to marinate for 10-15 minutes while you snap  the asparagus spears.  In a large saute’ pan heat the remaining 2 TBS of olive oil and brown and saute’ the chicken mixture over medium heat until chicken is cooked.  Remove chicken from the pan and set aside.
Return saute’ pan to the stove and add the quartered mushrooms.  Saute’ for 5 minutes over medium heat, stirring often.  With mushrooms still in pan, increase heat to medium high and deglaze with the marsala wine.  With wire whisk, tongs, or spoon, remove browned bits from the bottom of the saute’ pan and stir them into the marsala sauce.  Add chicken stock and heat sauce to a simmer.  Simmer the sauce for 10 minutes to reduce.  Steam your asparagus.  After 10 minutes, add the all purpose flour  to the sauce to thicken it.  Add chicken to the sauce.  Combine and coat the chicken with the sauce and in a large decorative serving bowl, serve it over the steamed asparagus.  Enjoy!

NUTRITION INFO: (Per Serving) 354Calories, Total Fat 13.8g, Sat. Fat 2.3g, Cholest. 78.6mg, Sodium 104.7mg, Carb. 13.9g, Fiber 3.1g, Sugars 4g, Protein 33.5g


Posted by Unknown 9:26 PM No comments


A versatile recipe for all your gluten-free baking needs. I use it for pancakes, waffles, cakes, cookies, scones, biscuits, and quick breads. When choosing which flour combination to use, consider that sorghum will give you the lightest result in baking. Millet and amaranth will give you a heavier result. For cakes and cookies, I recommend using sorghum. For breads, scones, and biscuits, millet or amaranth are good choices.

Gluten-free Flour Blend Ingredients

                                                              4 cups mix            8 cups mix 
Organic brown rice flour                    1 ½ cups               3 cups 
Organic white rice flour                     1 ¼ cups               2 ½ cups
Organic sorghum, 
buckwheat, millet or amaranth*      ½ cup                    1 cup
Organic potato starch flour               ½ cup                    1 cup 
Organic tapioca flour                          ¼ cup                    ½ cup 

Most of these flours are available at any heath food store or online.  Gluten free products are becoming more and more available, which is great!  I really love Bob's Red Mill gluten free flours.  They are all wonderful!  Now once I mix up my flour blend, I use it up pretty quickly so I store it in an airtight container in the pantry.  Store in the refrigerator for long term storage.


Any recipes that call for flour will use this mix unless specified.


Search

Bookmark Us

Delicious Digg Facebook Favorites More Stumbleupon Twitter